Pinterest Moodboard for Interior Design: From Inspiration to Client Presentation
Last Updated: March 2026
As an interior designer, Pinterest is where projects begin. You curate boards for every client—one for living room inspiration, another for bathroom fixtures, a third for color palette ideas. These Pinterest moodboards become the visual foundation of your design proposals. But when it's time to present to clients, you face a frustrating workflow gap: Pinterest doesn't export cleanly to presentation software or design tools. You're stuck manually downloading images one by one, losing hours to file management instead of design work. Here's how interior designers are using Pinpasta to transform Pinterest moodboards into polished client presentations in minutes, not hours.
Why Interior Designers Rely on Pinterest Moodboards
Pinterest is unmatched for visual discovery in interior design. It's where you find furniture trends, color combinations, spatial layouts, fixture details, textile textures, and lighting ideas—all organized by aesthetic, room type, or style direction.
For every project, you create Pinterest boards that reflect the client's taste and your design direction. A typical residential project might have boards for:
- Living Room — Mid-Century Modern
- Kitchen — Scandinavian Minimalist
- Primary Bedroom — Warm Contemporary
- Bathroom — Spa-Inspired Luxury
- Color Palette — Earth Tones with Navy Accents
These boards become shared references with your client. You pin ideas together during discovery calls. The client adds their own inspiration. Over weeks, the boards evolve into comprehensive visual guides for the project direction.
But Pinterest is a discovery tool, not a presentation tool. When it's time to create a formal design proposal, you need those images in Figma, PowerPoint, Keynote, or InDesign—not trapped in Pinterest's interface.
The Workflow Gap: Pinterest to Presentation
The traditional workflow for interior designers using Pinterest moodboards looks like this:
- Curate Pinterest boards with 40-80 images per room/theme
- Right-click each image and save it manually (30-60 minutes per board)
- Organize downloaded images into project folders
- Import images into Figma, PowerPoint, or design software
- Arrange images into moodboard layouts for client presentation
This process wastes 2-3 hours per project on file management alone. Worse, right-click saving often grabs low-resolution images that look pixelated in presentations or on large screens during client meetings.
Some designers try taking screenshots of Pinterest boards and pasting those into presentations. This is faster but looks unprofessional—you get Pinterest UI elements, watermarks, and compressed image quality. Not suitable for high-end residential or commercial projects where presentation quality reflects your design standards.
How Pinpasta Streamlines Pinterest Moodboards for Interior Design
Pinpasta eliminates the manual download workflow. It's a browser extension (available for Chrome and Firefox) that works as a Pinterest board downloader—extracting entire boards in one click, downloading high-resolution images, and—uniquely—sending them directly to Figma for moodboard creation.
Here's the interior designer workflow with Pinpasta:
Step 1: Curate Your Pinterest Boards (As Usual)
Nothing changes in your curation process. Create Pinterest boards for each room, style direction, or design element. Pin furniture, fixtures, color palettes, textiles, spatial layouts—whatever informs your design direction.
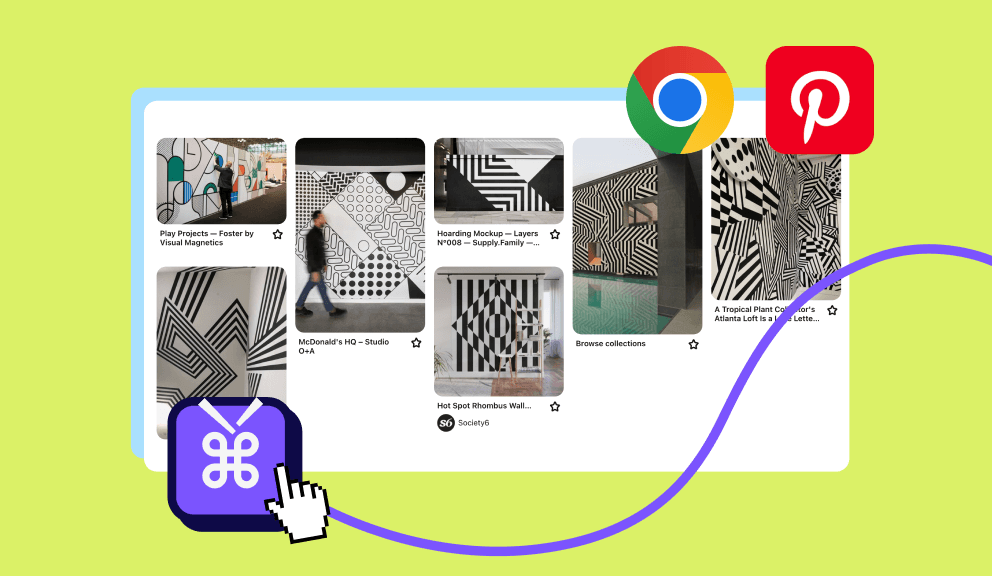
Step 2: Extract the Pinterest Board with Pinpasta
When you're ready to create the client presentation, open the Pinterest board and use the Pinterest board downloader by clicking the Pinpasta extension icon in your browser. Hit "Extract." Pinpasta scans the board and downloads the highest resolution version of every image—whether it's 20 pins or 200 pins.
Extraction takes 10-30 seconds for typical boards (30-60 images). Even large inspiration boards with 150+ pins extract in 1-2 minutes.
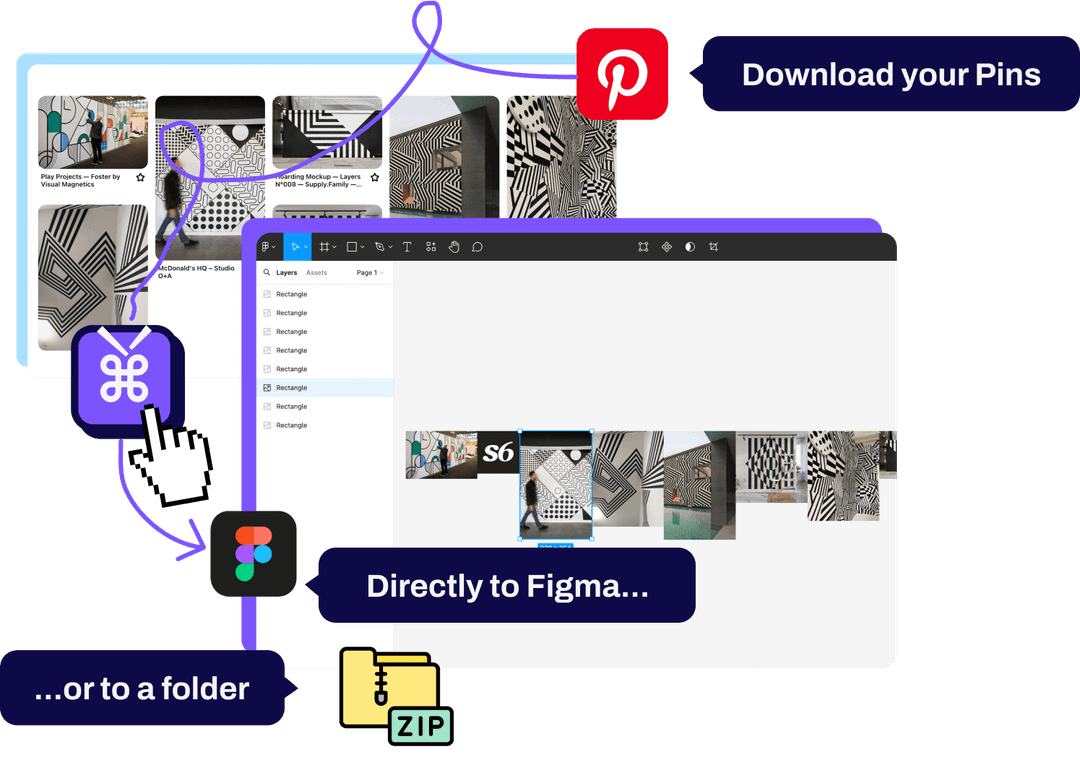
Step 3: Send Directly to Figma or Download as ZIP
After extraction, you have two options:
Option A: Send to Figma (Recommended for Designers)
If you've installed the Pinpasta Figma plugin, click "Copy to Figma" and all images appear instantly in your Figma workspace. No downloading, no file management, no manual importing. From there, arrange them into moodboard frames, add annotations, and export as a PDF or presentation deck.
Option B: Download as ZIP
Pinpasta packages all images into a labeled ZIP file saved to your downloads folder. Unzip it, and you have a folder of high-resolution images ready to import into PowerPoint, Keynote, InDesign, or any other presentation tool.
The time savings are dramatic. What used to take 2-3 hours now takes 5 minutes. You spend less time on file wrangling and more time on design thinking and client communication.
Complete Workflow: Pinterest → Pinpasta → Figma → Client
Understanding the full pipeline from inspiration to signed-off concept helps you plan projects efficiently. Here's the complete workflow many interior designers use with Pinpasta:
- Discover and curate on Pinterest — Create or use a shared board with your client. Pin furniture, fixtures, color palettes, textiles, and spatial references. Use Pinterest board sections to organize by category (Seating, Lighting, Textiles, etc.).
- Refine the board before extraction — Remove weak or off-brand pins. Aim for 40-80 strong images per room or concept. A curated board produces a sharper presentation.
- Extract with Pinpasta — Open the Pinterest board, click the Pinpasta extension, and hit Extract. The tool grabs the highest resolution available for every pin—typically 30-60 images in under a minute. For large boards, use Pinpasta's full board extraction.
- Send to Figma (or download ZIP) — With the Pinpasta Figma plugin installed, click "Copy to Figma" and all images appear in your canvas. Alternatively, download as ZIP and import into PowerPoint, Keynote, or InDesign.
- Build the moodboard in Figma — Create frames for each section (Color Palette, Furniture, Lighting, Textiles). Drag images into place, add annotations, material swatches, and notes. Use Figma's alignment and spacing tools for a polished layout. See our Pinterest to Figma guide for layout tips.
- Present to the client — Share the Figma link for live presentation or export as PDF. Clients can leave comments, mark favorites, and approve sections. Iterate based on feedback and lock in the design direction.
From a curated Pinterest board to a client-ready moodboard, the entire process can take 45-60 minutes instead of half a day. The moodboard creation workflow becomes repeatable across every project.
Using Figma for Interior Design Moodboards
Many interior designers have switched to Figma for moodboard creation. It's faster than PowerPoint, more collaborative than InDesign, and free for basic use. With Pinpasta's direct Figma integration, the Pinterest-to-Figma workflow becomes seamless.
Here's a typical Figma moodboard workflow for interior designers:
- Create a Figma file for the project (e.g., "Smith Residence - Living Room Concept")
- Set up frames for each moodboard section: Color Palette, Furniture, Textiles, Lighting, Flooring
- Use Pinpasta to extract your Pinterest board and paste images directly into Figma
- Drag images into their appropriate frames and arrange them spatially
- Add text annotations, material swatches, or notes
- Export as a PDF for client review or present live in Figma during meetings
Figma's collaboration features also let you share the file with clients. They can leave comments, mark favorites, or react to specific images. This creates an interactive design approval process that feels more engaging than static PDFs.
New to creating moodboards from Pinterest? Read our complete guide to creating moodboards. Or learn about direct Figma integration.
Learn more about the Pinterest to Figma workflow in our detailed guide.
Real-World Scenario: Residential Living Room Design
Let's walk through a typical interior design project using Pinterest moodboards and Pinpasta.
Project: High-end residential living room, contemporary style with warm textures
Client: Young professional couple, mid-30s, budget-conscious but values quality
Phase 1: Discovery and Curation (Week 1)
You create a shared Pinterest board with the clients. During the discovery call, you pin 10-15 initial ideas—sectional sofas, coffee tables, area rugs, lighting fixtures—all reflecting a contemporary aesthetic with warm wood tones and neutral palettes.
The clients add their own pins between meetings. By the end of Week 1, the board has 45 images representing a cohesive design direction.
Phase 2: Concept Development (Week 2)
You refine the Pinterest board, removing weak references and adding specific product examples. The board now has 60 curated images organized into mental sections: Seating, Lighting, Textiles, Accent Pieces, Color Palette.
Phase 3: Presentation Creation (Week 3)
It's time to formalize the concept for client approval. You open the Pinterest board, click Pinpasta, extract all 60 images, and paste them into Figma.
In Figma, you create frames for each section and arrange the images. You add notes: "Option A: Leather sectional with brass legs" or "Lighting: Statement floor lamp + ambient wall sconces." You include material samples, paint swatches, and budget estimates.
The entire moodboard creation process—from Pinterest extraction to polished Figma presentation—takes 45 minutes. Without Pinpasta, manually downloading and organizing 60 images would have taken 2+ hours.
You export the Figma file as a PDF and email it to the clients. During the presentation meeting, you share the Figma link and walk through each section. The clients leave comments directly in Figma, marking their top three furniture options and flagging questions about rug sizing.
Pinterest Moodboard Best Practices for Interior Designers
To get the most out of Pinterest moodboards and Pinpasta, follow these best practices:
Organize Boards by Project and Room
Create separate Pinterest boards for each project phase or room. Instead of one massive "Smith Residence" board, create:
- Smith Residence - Living Room
- Smith Residence - Kitchen
- Smith Residence - Primary Suite
- Smith Residence - Color Palette
This makes extraction and presentation creation easier. When you extract a board with Pinpasta, you get a focused set of images for one room or concept, not a mixed bag.
Curate Ruthlessly Before Extracting
Pinterest makes it easy to save everything. Resist that urge. Before extracting a board for presentation, remove weak images, off-brand ideas, or redundant examples. A tight 40-image moodboard is more impactful than a sprawling 100-image dump.
Use Sections in Pinterest Boards
Pinterest lets you create sections within boards (e.g., "Furniture," "Lighting," "Color Palette"). This organization translates well to moodboard creation. When you extract the board with Pinpasta, images maintain their order, making it easier to group them in Figma or PowerPoint.
Include Product Details When Possible
When pinning furniture or fixtures, prioritize pins that link to product pages with specifications and pricing. This makes it easier to transition from moodboard to procurement. You're not just showing inspiration—you're showing sourcing options.
Backup Important Project Boards
Pinterest accounts can be suspended or boards can be accidentally deleted. For high-value projects, use Pinpasta to backup project boards as ZIP files. Store them in your project folder or cloud storage. If something goes wrong with Pinterest, you still have the images. Learn more in our Pinterest board backup guide.
Room-by-Room Moodboard Strategy
Different rooms have different design priorities and client expectations. Organizing your Pinterest boards—and your extracted moodboards—by room type keeps projects manageable and presentations focused.
Living Room
The living room is often the most visible space. Moodboards should cover seating arrangements, focal points (fireplace, TV wall, window), lighting layers (ambient, task, accent), textiles (rugs, throw pillows, curtains), and accent pieces. Create Pinterest sections for each category. When extracting with Pinpasta, you'll have a coherent set ready to arrange in Figma. Clients typically expect 3-5 furniture options and 2-3 lighting concepts.
Kitchen
Kitchen moodboards emphasize materials (countertops, cabinetry, backsplash), fixtures (faucets, sinks, lighting), and layout. Pinterest is excellent for cabinetry styles, tile patterns, and hardware. Organize boards by "Cabinetry," "Countertops & Backsplash," "Fixtures," and "Lighting." Kitchen clients often want to see material swatches and finish combinations. Include close-up texture pins alongside full-room shots.
Bedroom
Bedroom moodboards focus on the bed as the anchor—headboard styles, bedding, and bedside lighting—plus storage, window treatments, and color palette. Create sections for "Bed & Bedding," "Lighting," "Storage," and "Textiles." Clients appreciate seeing fabric samples and paint swatches alongside inspiration images. A tight 30-40 image bedroom board works well; avoid overcrowding.
Bathroom
Bathroom boards highlight fixtures (vanity, tub, shower, faucets), materials (tile, countertops), lighting, and storage. Pinterest excels at tile patterns, vanity styles, and spa-inspired details. Organize by "Vanity & Storage," "Tile & Surfaces," "Fixtures," and "Lighting." For smaller bathrooms, clients often want 2-3 layout options. Include both full-room views and detail shots of fixtures and finishes.
For multi-room projects, extract each room's board separately with Pinpasta. Create a dedicated Figma file or frame per room. This room-by-room approach keeps presentations clear and makes revisions easier when the client wants to iterate on one space without touching the others.
Organizing Your Downloads
When you download Pinterest boards as ZIP files—rather than sending directly to Figma—a consistent folder structure and naming convention saves time across projects.
Recommended Folder Structure
Create a project folder with subfolders by room or concept:
ProjectName/— e.g., Smith_Residence_2026ProjectName/01_Living_Room/— extracted images for living room moodboardProjectName/02_Kitchen/— kitchen inspirationProjectName/03_Primary_Bedroom/— bedroom conceptProjectName/04_Bathroom/— bathroom fixtures and finishesProjectName/05_Color_Palette/— shared color and material references
When Pinpasta extracts a board, it saves a ZIP file. Unzip each into the corresponding room folder. This keeps images discoverable months later when you're sourcing or creating as-built documentation.
File Naming Tips
Pinpasta preserves original filenames from Pinterest, which can be generic (e.g., pin_12345.jpg). For better organization, consider a quick rename pass for key images: Room_Category_Description.jpg (e.g., LivingRoom_Sofa_LeatherSectional_01.jpg). For most workflows, the default names are fine—especially if you're sending directly to Figma and organizing there. Reserve manual renaming for images you'll reference repeatedly or share with contractors.
Cloud Sync and Backup
Store project folders in Google Drive, Dropbox, or iCloud. This gives you access from any device and creates an automatic backup. When collaborating with other designers or project managers, a shared folder structure ensures everyone works from the same organized set of images.
Presenting to Clients
Downloaded Pinterest images become the visual backbone of your client presentations. How you present them affects perceived professionalism and client confidence.
Live Figma Presentations
Share the Figma file link with "can view" permissions. Walk the client through each frame during a video call—zooming into details, explaining material choices, and answering questions in real time. Clients can leave comments on specific images. This interactive format feels collaborative and modern. Prepare a clean frame order (Color Palette first, then furniture, then finishes) so the narrative flows logically.
PDF Exports for Asynchronous Review
Export moodboard frames as a multi-page PDF. Clients can review offline, share with spouses or family, and return written feedback. Use clear page titles ("Living Room — Seating Options") and consider adding a cover page with project name and date. PDFs work well for clients who prefer to digest information before a call.
For both live and PDF presentations, add brief annotations: "Option A: Leather sectional — $2,400" or "Tile: Cle from Fireclay — $18/sq ft." These details demonstrate you've moved beyond inspiration to actionable sourcing.
Print-Ready Moodboards
Some clients expect physical moodboards for in-person meetings. Export high-resolution PDFs from Figma (300 DPI for print). Pinpasta downloads images at Pinterest's highest available resolution—usually sufficient for letter or tabloid size. For large-format prints, source final images from manufacturer sites. A printed moodboard can feel more tactile and permanent, especially for high-touch residential projects.
Managing Client Feedback
When clients request changes, update the Figma moodboard and re-export. If feedback is "more options for the sofa," add a new round of Pinterest extraction for that category, paste into Figma, and present the updated frame. The Pinterest-to-Figma workflow makes iteration fast—no need to rebuild from scratch.
Using Pinterest Moodboards for Client Collaboration
Pinterest isn't just an internal tool—it's a collaboration platform. Many interior designers create shared boards with clients, allowing them to add their own pins and react to ideas.
This collaborative curation has benefits:
- Client Buy-In: Clients feel ownership of the design direction because they contributed
- Fewer Surprises: You see what resonates with them before finalizing concepts
- Faster Approvals: The final moodboard reflects ideas they've already reacted positively to
However, collaborative boards can get messy. Clients sometimes add off-brand ideas or conflicting aesthetics. Use Pinterest sections to organize their contributions separately ("Client Inspiration" section vs. "Proposed Direction" section). When creating the final presentation, extract the entire board but curate selectively in Figma.
Alternatives to Figma for Interior Design Presentations
While Figma is popular with designers, some interior designers prefer other tools. Pinpasta works with all of them:
PowerPoint or Keynote: Download the Pinterest board as a ZIP file, unzip it, and drag images into your presentation slides. Add text overlays, arrange in grids, and export as PDF.
InDesign: Use Pinpasta's ZIP download to get high-resolution images, then import them into InDesign for print-quality moodboards or client lookbooks.
Canva: Download images with Pinpasta and upload them to Canva for quick, template-based moodboard creation. Canva's drag-and-drop interface is fast, though less flexible than Figma.
Morpholio Board: Some interior designers use Morpholio Board (iPad app) for moodboard creation. Download Pinterest images with Pinpasta, sync them to your iPad via cloud storage, and import into Morpholio.
Frequently Asked Questions: Pinterest Moodboards for Interior Design
Q: Can I download Pinterest boards with product links and pricing intact?
A: Pinpasta downloads the images themselves, not the associated Pinterest metadata (links, descriptions, pricing). If you need product details, keep the original Pinterest board open for reference, or manually note product sources before extracting.
Q: Will Pinpasta work with private or secret Pinterest boards shared with clients?
A: Yes. As long as you're logged into Pinterest and have access to the board, Pinpasta can extract it—whether it's public, private, or secret.
Q: How do I maintain image quality when creating printed moodboards?
A: Pinpasta downloads the highest resolution version Pinterest serves (typically 1200-2000px wide). For most presentation uses, this is sufficient. For large-format printing, source final images from manufacturer websites or stock libraries for absolute highest resolution.
Q: Can I use Pinpasta to create moodboards for multiple clients simultaneously?
A: Yes. Extract each client's Pinterest board separately with Pinpasta, creating dedicated folders or Figma files per project. The extraction process is fast enough (30 seconds per board) that handling multiple projects in one session is practical.
Q: What if a client's Pinterest board has 200+ pins? Can Pinpasta handle that?
A: Yes. Pinpasta handles large boards (1,000+ pins) reliably. A 200-pin board takes 2-3 minutes to extract. The free version caps at 30 images per batch, so for large boards, you'll need Pinpasta Pro ($29.99 lifetime).
Q: Is using Pinterest images in client presentations legal?
A: Pinterest images are copyrighted by their original creators. Using them in moodboards for client inspiration and concept presentation (not final deliverables) is generally acceptable fair use. Don't redistribute images publicly or use them in marketing materials without licensing.
Q: Can I extract multiple Pinterest boards at once for a multi-room project?
A: Pinpasta processes one board at a time. For multi-room projects, extract each board individually (Living Room, Kitchen, Bedroom, etc.). Each extraction takes 30-60 seconds, so even a 5-room project takes under 5 minutes total.
Transform Your Interior Design Workflow
Pinterest moodboards are essential for interior designers, but the platform was never designed for professional presentations. Pinpasta bridges that gap—turning curated Pinterest boards into client-ready moodboards in minutes instead of hours.
Whether you create presentations in Figma, PowerPoint, InDesign, or Canva, Pinpasta streamlines the extraction process. No more right-click saving. No more low-resolution screenshots. No more wasted hours on file management.
The free version of Pinpasta gives you 30 images per batch and full Figma integration—enough to test the workflow on a small project board. For larger boards or ZIP downloads, Pinpasta Pro is a one-time $29.99 payment. For interior designers who create multiple Pinterest moodboards per month, that investment pays for itself in saved time on the first project.
Install Pinpasta, extract your next client board, and experience how much faster the Pinterest-to-presentation workflow can be. Your clients won't notice the process change, but you'll notice the extra hours back in your week.
Interior designers: turn Pinterest boards into client presentations in minutes
Extract entire Pinterest boards, send directly to Figma, create polished moodboards fast. Free for 30 images, $29.99 lifetime for unlimited. Built for design professionals.